AccuMark 8.4.0 Importing CSV Orders
The ability to import orders from a main frame via Batch has been introduced in AccuMark Release 8.4.0. This new function allows you to automatically import marker orders from a mainframe system into your AccuMark system, as “Comma Separated Value” files (CSV). By using this option in Batch, the speed of automatic order entry, marker processing, as well as Plot and Cut file generation for multiple orders can be increased. In addition, the ability to generate all Marker Reports has also been implemented in 8.4.0.
Important NOTES:
• P-Batch parameter tables must be saved in N:\userroot\bprmtbl (where “N” is the drive in your system where Batch has been installed and actively running.)
• Engine.que > Manages jobs sent to Batch Processing; in 8.4.0, the ability to share a
Batch queue was introduced; to set up a shared Batch queue, go to File > and determine where in your network the queue will be located.
• Import Orders via Batch> Text Files needed to run Import must be saved in N:\userroot\batch (where “N” is the drive in your system where Batch has been installed and actively running.)
• Watch Directory > this location is used by Batch to automatically download order entries. All CSV files must be placed in this folder either manually or by a “*.Bat” file.
• Batch Import Order Entry Log is saved in C:\Userroot
• AccuMark External XML Batch Engine > must be running when Import Orders via Batch is used (The XML Batch Server searches the Watch directory). It installs automatically when AccuMark is loaded and runs whenever your system boots up. To verify it is running, find its icon in the Windows task tray next to the clock:
• Use your Right mouse button and left click on Open to:
o Find out software version o On/OFF Run Server
IMPORTANT!! Once the dialog box is open, DO NOT click on the “X” button, since it will shut the XML Batch Engine down; instead, click on the Minimize button ( _)
• What to do if XML Batch Engine is shut off> o Option 1> if you have administrator rights, go to C:\Program Files\Gerber Technology\AccuMark V8\MmAmBatch and double click on XMLBatchServer.exe.
 o Option 2> if you do NOT have administrator rights, restart your system; that will bring your AccuMark External XML Batch Engine back ON.
 Import Order Workflow:
• From Main menu in Launch Pad, go to AccuMark Explorer, Utilities and double click on the Batch icon
• In Batch Processing window, go to File > New. Complete your P-Batch Parameter table accordingly (refer to the Batch On-Line Help for further information on how to complete Batch Parameter Table contents). Important options to consider:
o If you wish to make markers automatically, select AUTO as a Marker Method to use Automark (new and enhanced engine available in 8.4.0 also) or AccuNest; complete Automark options accordingly; select LAY Marker Method if you wish to use Layrules
o Check Plot and/or Cut boxes to generate plot and/or cut files; o Under Batch Options, you may select the new option “Automatically Generate Marker Reports”.
o When generating Cut files and/or Marker Reports, you MUST specify an Export Directory folder; click on the look up button to the right of this field, and select an existing folder; if the folder does not exist, you can type in the name of the new folder after the drive and path. When Batch generates Cut Files and Marker Reports, the folder will be created automatically.
• Import Orders via Batch> In N:\userroot\batch, select the next two text files that must be completed before importing orders via Batch (they can be open and edit with Notepad):
o Order settings.txt > this file contains the following information. You MUST create a file containing your AccuMark table names and save it as different name
l=lay limits table a=Annotation Table g= P-Notch Table.
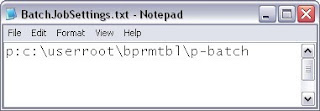
o Batch Job settings.txt > this file indicates the Batch Parameter Table to be used. You MUST create a file containing your P-Batch table name and save it as different name
• Now, from the Batch Processing window Main Menu, go to File > Import…
• Import Box > in the first two fields, complete the contents by selecting the two txt files just completed in step above (Order Settings and Batch Job Settings) by clicking on the lookup button to the right of each field
• Watch Directory > select the folder where the orders to be processed by Batch will be placed.
• CSV Files> under this section, use the “Add” button to add jobs manually; click on “Process” to process an order or group of orders from within this box.
• “View Log” > click on this button to open the Import Order Batch Activity Log; the orders processed by Batch that come from a mainframe, will be displayed in this list…
• The image below displays an example of an order entry in CSV format (CSV files can be open and edit in Excel)
• Once order CSV files are placed in the Watch Directory, it will take a few seconds for
Batch to start processing the orders. Orders processed this way will display in the Batch Queue. Once completed, the status of each one will display under the status column.
See examples below:
1. Jobs In process…
2. Jobs completed…
• Right click on Marker name to do any of the following actions…
• Cut files and Marker Reports will be found in the Export Directory selected in the Batch Parameter table …


0 Komentar untuk "AccuMark 8.4.0 Importing CSV Orders via Batch Processing "